Original Link: https://www.anandtech.com/show/209
| The latest 3D accelerators support "Anisotrophic filtering", "Trilinear filtering", "Single pass Multitexturing", etc. What do all these names really mean? How do they affect image quality. How come people say trilinear filtering is so much better than bilinear filtering when screen shots look virtually identical? All of this and more will be answered in this article. | |
| NOTE: For the image quality examples, a 24 or 32bit screen resolution is helpful. (It's hard to see the difference between 24bit and 16bit if your desktop is running at 16bit!) | |
Color Depth
Perhaps one of the most noticeable improvements over previous hardware architectures is the jump from 256 color to 16bit color. With 16bit color, a full 64k colors are displayable on the screen. This improvement brought life to newer games, eliminated sharply contrasting color, allowed for cool features such as colored lighting, true smooth color transitions, and more. I won't even bother showing the difference between 256 color and 16bit color; I'm sure you all know the difference; but how about 24bit color? The latest hardware accelerators support 24bit color output. Is there really a big difference between that and 16bit color? Check out these snapshots:
16bit Color, Click for Enlarged Image |
24bit Color, Click for Enlarged Image |


Obviously, there isn't much of a difference between these two snapshots. (Where did I get these ugly snapshots? Well, they are from my homebrewed software rendering engine)
Why 24bit color?
Isn't 16bit color enough? I mean, there are 64k colors available, why do we need anymore? The problem isn't really the number of colors; it is WHICH colors are available. The standard format for a 16bit color is 5bits Red, 6bits Green, and 5bits Blue. This means that there are only 2^5 = 32 shades of Red available, 2^6 = 64 shades of Green available, and 2^5 = 32 shades of Blue available. The problem with this is that if you want to create a gradient of red which covers the whole 800x600 game screen, it will look pretty ugly, because 600/32 = ~19 pixels will be of the same color before the gradient changes. This will be painfully noticeable. (Grandmaster B elaborates on this a bit)
With 24bit color, the colors are split up into 8bits Red, 8bits Green, and 8bits Blue. This gives us 2^8, or 256 shades of each color. This is much more visually pleasing than only 32 or 64 shades of each color. A gradient of red for our 800x600 screen will only have ~2 rows which are of the same color; barely noticeable.
If 24bit color allows for such smoother color transitions, how come it isn't visible in the above snapshots. The answer is, it is, just on a much smaller scale.

As you can see from this snapshot, (the coarsest part is actually the dark brown in the 16bit color, not the part circled (blame it on JPEG) The 16bit color image has harsh transitions between colors, while the 24bit image is much much smoother. Does it really make a difference if you can only tell that it is 16bit color by zooming in? Not really; however, wherever in a game there is some sort of gradient, or gradual fading, (lighting is an example) 24bit color is going to look significantly better than 16bit color. If you are running your desktop in 16bit color, you will notice that the pinkish clouds in the background will probably not look as smooth as intended, when, in fact, on a 24bit color screen, they look virtually flawless.
The Deal with 32bit Color
What is 32bit color? Does 32bit color gives us 10,12,10 bits of shades? Actually, 32bit gives the exact same image quality as 24bit color. The extra byte is generally labeled A (for ALPHA) and tells how transparent the pixel is. Notice that the video card does not use this A value automatically; however, programmers can take advantage of this extra storage per pixel to do some neat effects.
Why do we need 32bit color if it is the same thing?
One of the major reasons 32bit color was "invented" is because certain video architecture (especially 128bit architectures) can more easily deal with a power of 2 number of bits, rather than an odd number like 24. I am guessing that the RIVA 128, and other high bandwidth 128bit architectures) pass 128bits every time, and dealing with "fractional pixels" (i.e. passing in 128bits worth of 24bit pixel will give the RIVA 5 pixels , and the Red component of the 6th pixel to process, not very pretty)
Read on to find out more about texture mapping.
Texture Mapping Basics
The most noticeable improvement
Perhaps the most noticeable image quality improvement ever is texture mapping. Prior to texture mapping, single colored polygons and lighting could emulate smooth surfaces quite well; however, texture was missing in these games. It was very difficult, or impossible to give the player a feeling of navigating through a real world with brick walls, wooden floors, grass, and more. Texture mapping allows game developers to map a "texture" (an image) onto a polygon. This way, what once was a brown square can transform into a square with a stone texture, so it would look like it is made of stone, or a square with a sign texture mapped on it. Well, you probably know what texture mapping is so I won't bore you with any more details...
Linear texture mapping
The first texture mapped games (Ultima Underworld, Magic Carpet I) did something called "linear texture mapping". This texture mapping method worked well for polygons which were facing the player directly, and those which were far away; however, when you got closer and closer, the polygons became severely warped. The reason for this is that when they went through the rows and columns "choosing" the coordinate in the texture which to draw, these games did not take the polygons 3D attributes into consideration. This type of texture mapping is unacceptable in today's games. I don't believe ANY 3D accelerator EVER used linear texture mapping.
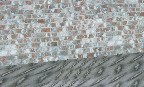
Notice the texture warping on the floor underneath the brick wall.
Perspective Correct(ion)
How was this problem fixed? Well, the polygons 3D attributes have to be taken into account. Perspective Correction is a somewhat difficult technique to understand, so I will explain it in a different article coming soon... Briefly (VERY briefly) Perspective Correction projects the Texture X and Y coordinates before interpolating them across the polygons rows and down the edges, "unprojecting (multiplying by Z, or dividing by 1/Z" the X,Y coordinates (to get the real texture coordinate) and then draws it. What?! Don't worry, you aren't supposed to understand it... Just know that all 3D accelerators have Perspective Correction; actually, technically speaking they produce perspective CORRECT images (perspective correction implies that the "true" texture X,Y coordinates are calculated every x number of pixels, and then the polygon display function linearly interpolates (i.e. adds a step value) to find the next pixel) Anyway, perspective correction is a given nowadays.
Point Sampling
Recall I spoke about "multiplying by Z", "interpolation (adding step values)" etc.? Unfortunately, we can only plot whole point coordinates, so even though our Z values may have decimals, and our step values may be fractional, we can only plot whole points. This causes visual anomalies because we are never actually plotting the correct pixel. Point sampling is the process of selecting the nearest whole value texture coordinate to display. This is the simplest, fastest, and ugliest way of choosing the pixel to draw. This is the method most software renderers use (up until Unreal)
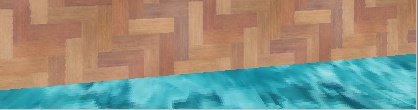
Notice the pixelation at the bottom right corner. Since point sampling sometimes chooses the same point over a few times, pixelation occurs. Also notice some jagged edges in the wooden "wall". (Again, snapshot taken from my 3D engine) Notice that these images are perspective correct. (No, I didn't come up with some ingenious algorithm for doing true perspective correction, I do the good old 2 fixed point! (haha, you can't get any slower than that!) divisions per pixel). Notice that the pixelation in this image is probably less than what you will get with other point sampling engines because (a) The original images are pretty smooth (b) The textures are 256x256 (c) The "water" (Hey, its better than the quake water :) is relatively far away.
Anyway, enough talking about outdated techniques, lets get on to the current method of selecting pixels. (well, relatively current)
Bilinear Filtering
What does bilinear filtering do? Well, bilinear filtering is a weighted average of the colors of the 4 nearest pixels to the actual location. Pretty simple huh? Unfortunately, it is also pretty slow... This technique is almost solely restricted to hardware 3D because it is extremely slow to implement in software. (~ 12 multiplication's and 4 additions, when using true color modes) As you can see from the screen shot below, bilinear filtering "smooths" images, sometimes a little too much.
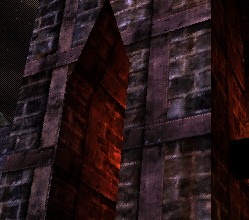
It's somewhat dark, but you can probably tell that the bricks and textures are "smoothed". This is the outcome of bilinear filtering. (I won't say that this IS bilinear filtering because I am not sure if Unreal's software renderer does "real" bilinear filtering. It seems to me as if they cheat a little)
Where does the name bilinear filtering come from anyway? Translating bilinear you get something like "two lines", or "in two lines", or possibly "two dimensional". This means that bilinear filtering samples (chooses) the best pixel by blending in two dimensions, i.e. it blends the closest to texture coordinates on the X coordinates with the two closest on the Y coordinates, as opposed to simply performing a weighted average on the two X-coordinate pixels (i.e. texture coordinate 2.3,2.3 would be rounded to 2.3,2 and then they would take a weighted average of the points 2,2 and 3,2; instead of taking a weighted average of the points (2,2), (3,2), (2,3), (3,3). Bilinear filtering is probably the most noticeable image quality improvement that comes with 3D hardware.
Even though bilinear filtering is great, it has it's shortcomings; most noticeably, the "texture sparkle" effect which is very common. I would have given you a snapshot but its only really noticeable in motion, and I don't want to make an AVI...
Advanced Texture Mapping
Introduction
Even though bilinear filtering is excellent at rendering still images, it has problems eliminating the sparkling effect because bilinear filtering does not smoothly transition from the first group of 4 pixels used to the second. This "unsmooth" transition causes sparkling. In order to eliminate sparkling somewhat, a technique called MIP mapping is used. Sparkling is eliminated almost entirely by trilinear filtering.
MIP Mapping
Mip mapping is the process of creating a multiple copies of the same texture, but with different sizes and pre-filtered MORE ACCURATELY THAN BILINEAR FILTERING (Other wise, MIP Mapping would have no effect). What is more accurately? Well, honestly, I don't know what they do, probably just filter at a higher quality (with more precision) or filter with more than the nearest 4 pixels? I don't know, E-mail me if you DO know)
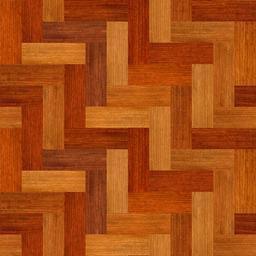
Below is an example of a texture with 3 MIP MAPS generated for it:


![]()
128x128 original 64x64MIPMAP 32x32 MIPMAP
The original method of MIP mapping would be to chose the most applicable MIP map (i.e. the one that most closely fits the size of the projected polygon (i.e. the polygon on the screen, which is actually 2D) This method works well when combined with bilinear filtering; however, it is not fully successful in removing shimmering because shimmering can occur because the pixels are chosen from only 1 MIP Map (and the correct pixel is actually on a MIP map in-between the two MIP Maps) In order to fix this problem, we simply blend, not pixels, but with MIP Maps. When we choose the correct pixel, we want it to be chosen from a blend of the two nearest mip maps. This technique is called trilinear filtering.
Trilinear Filtering
Trilinear filtering, as mentioned above is the process of blending the two nearest mip maps and then bilinear filtering by choosing the 4 nearest pixels from the blended mip map. Because we blend, the transitions from one mip map to the next is very smooth. Unfortunately, as with bilinear filtering, smooth, also means blurry. While trilinear filtering virtually eliminates shimmering and sparkling, trilinear filtering causes images to become extremely blurred in the background, especially floor textures. This is why many developers and card manufacturers say that trilinear filtering is not a significant improvement. There is another method; however, which is capable of achieving the smooth images of trilinear filtering, without most of the aliasing (in this case excessive bluriness) which occurs with trilinear filtering..
Anisotrophic Filtering
What Anisotrophic Filtering does is choose the correct pixels for filtering. (i.e. if a polygon is 20 pixels wide and 80 pixels tall in screen space, instead of choosing the nearest 4 pixels in a square fashion, anisotrophic will choose 4 pixels one underneath the other, since this most accurately reflects the polygon being drawn. Why does this work? Well, if we want to find the EXACT color at a certain non integer location, we must actually blend ALL of the pixels in the texture, using the weighted average technique. Unfortunately this is way to slow. In order to speed this up, we only chose the nearest 4 pixels (actually square) and assumed that the others will not have as much of an impact. In reality; however, with thin polygons, it is more accurate to choose 4 pixels which mimic the shape of the polygon (i.e. a thin rectangle = a thin 4 pixel rectangle for filtering; some architectures like PowerVRSG choose more than 4 pixels, which is why it takes 4 clock cycles to "anisotrophically" filter a pixel with PowerVRSG) So, basically, anisotrophic filtering chooses the best pixels to perform a weighted average on, not only pixels in the nearest square. Anisotrophic filtering is starting to make its way into the mainstream accelerator market, being available in the Riva TNT.
Multitexturing, blending, etc.
Introduction
The second big thing in 3D is lighting. While 3D accelerators can perform gouraud shading, this form of shading is relatively inaccurate, and old. Many current 3D games such as Quake2 and Unreal use a better method of creating realistic lighting, multitexturing. What is multitexturing? Find out...
Multitexturing
Multitexturing is blending two textures to get the color or the pixel to plot. Multitexturing is very useful because programmers can blend a brick wall, for example, with a lightmap (a texture which acts as a light) and achieve a lighted brick wall using multitexturing. How are the two textures blended? That depends on the blending mode. There are quite a few blending modes available, and to be honest, I don't know exactly what a single one of them does, if anyone can help me out here, e-mail me. My engine actually supports a form of blending (the wooden wall in previous pages' snapshots is actually a wooden wall blended with a lightmap i made using lens flare.) , take the first color add the second color, and shift right 1 bit (i.e. divide by 2) Simple, and not only that, it works. (well, it does what I expected it to do) Here are examples of the effects of this primitive form of blending:
Original texture
+
Blended texture
=
Multitextured Polygon (smaller and crooked becuase i took snapshot from engine)
While this may not be the most accurate way of blending two textures, it gives you a good idea of how multitexturing works. There are numerous blending modes used in games like Quake2, Unreal, etc. These blending modes dictate how the two textures should be mixed, i.e. should the dominant color be perhaps the blue from the water? or maybe the brown from the wood? I'm sure there are many other blending modes which do all sorts of cool things.
Why Lighting using Multitexturing?
The reason the latest games use multitexturing effects to emulate lighting is because the lightmaps can be precalculated "perfectly" and when blended the lighting effect will be "perfect". Currently all real time algorithms for lighting calculations are approximations, and the latest games which want ultimate realism do not wish to settle for lame approximations! Using lightmaps and multitexturing, game programmers can precalculate the light as they would like it, blend the texture with the lightmap, and *poof* the texture is "magically" lighted. Multitexturing can be used for other cool effects, like what I did (err, what I tried to do, make the wall look like it was covered in water). The reason my wall turned out to be green is because my blending mode is not the one which I should have used. (Well, I could have fiddled with the colors of the water (i.e. make the water brownish) so that way it would keep the color of the wood somewhat)
So now we know that hardware can do some many things. What can't hardware do? Let's find out...
Hardware Limitations
Introduction
What image quality improvements can't current we (err, developers) do(or can't do well)? Well, actually, a lot of things. I will talk about 2 of these things, Voxels, and Translucency. Note some of the things mentioned CAN be done with software rendering.
Voxels
What are Voxels? Well, before I start talking about why hardware can't accelerate them it would help to know what Voxels are. Voxels, or Volumetric Pixels (official name) are 3D pixels. An engine which uses Voxels would be one that, instead of texture mapping polygons, it works entirely with Voxels, i.e. 3D points. All of these 3D points would be drawn and all of them transformed, etc. You can think of a Voxel as a 1x1 polygon. This is one of the types of rendering we will see in the future. The reason current hardware cannot accelerate Voxels (current, i.e. Permedia 3 will be able to, also, high end SGI machines can) is because it is not designed with Voxels in mind. Treating a Voxel as a 1x1 polygon to make it hardware compatible will be much slower than rendering a Voxel engine in software mode. It is painfully obvious that current hardware cannot accelerate Voxels (neither can current PCs); however, there is a slight spin off of Voxels that is pretty useful and cannot be accelerated by hardware, that is displacement maps.
Voxels Today: Displacement Maps
Displacement Maps are textures with a height value tagged on to each pixel. This is one form of bump mapping (not the form hardware uses, they use weird normal deformations, etc.) which can be useful in representing either terrain (i.e. Commanche) or rough surfaces. (Unreal castles could have benefited from bump mapping.) Again, current hardware was not built with this in mind, so if you a developer decides to use displacement maps, he/she will have to resort to software rendering.
Translucency
Wait a minute! I see translucency in lots of games! While it is true that Transluceny is present, current developers "cheat" in order to get it to work. There are a few problems with translucency's. The first problem is how is it possible to tell whether or not the translucency is behind or in front of the lastly drawn polygon (i.e. if the translucency is even visible. If we fix this problem by storing the translucency data in the Zbuffer (a data structure telling us what is visible and what isn't) then we can't tell which non translucent polygon is behind it. (We need that polygon so we know what to blend the translucency with) There is only one way (that I know off) to get unlimited transluceny's to display properly in an arbitrary 3D environment. This method basically requires a ton of translucency buffers (or a Translucency buffer made up of linked lists). In other words, its impractical. This is why current hardware doesn't support "real" translucencys.
Conclusion
I hope you all enjoyed this article, and learned something about 3D rendering, what lots of features do, and how they effect image quality. E-mail me if you have any comments/questions. (I am Ga'ash, not Anand :)


