Overclocking the GeForce2 MX
Taken from Overclocking the GeForce2 GTS Review
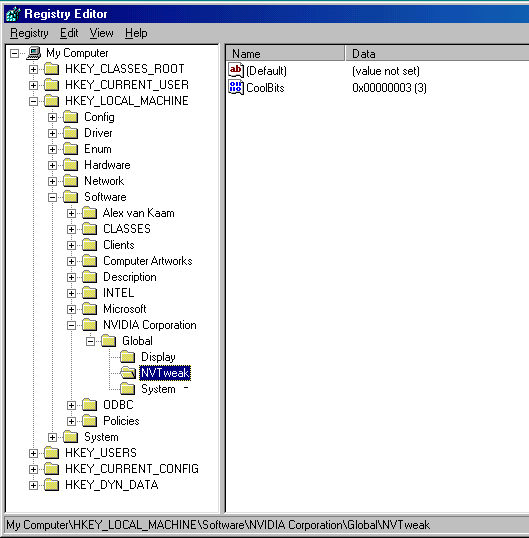
By now you’ve probably heard of NVIDIA’s ‘CoolBits’ overclocking switch in the registry to enable their overclocking utility. Like every other company, NVIDIA doesn’t officially support overclocking their cards, but they do provide us with this “hidden” (obviously not very well) utility that allows us to do just that. Here’s how you enable it:
To gain access to core and memory overclocking utilities, simply run Window's registry editor (regedit) and perform the following steps:
1. Open the key, [HKEY_LOCAL_MACHINE\Software\NVIDIA
Corporation\Global\] by navigating down to it in the left hand pane.
2. Add a new key named "NVTweak".
3. Go under this new key and add a new DWORD value with the name "CoolBits".
4. Double click on CoolBits in the right hand pane and set the value to 3 with
a hexadecimal base.
5. Reboot.
A screen shot of what your registry should look like is given below:

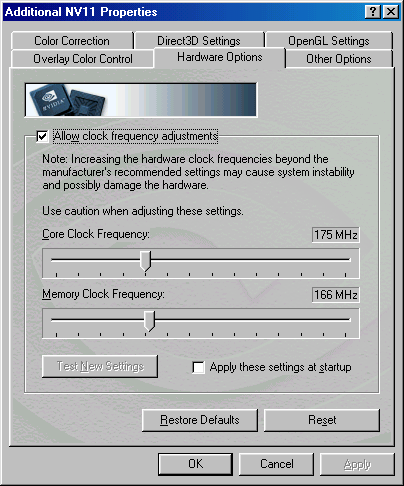
After performing these steps, an overclocking screen will be available under the additional properties of your video card. First you must enable overclocking by clicking on the "enable" check box. After a reboot, you should be up and ready to overclock. Before enabling the core and memory speeds you select, the utility will "test" the configuration. What it does during this process is beyond us, as we have yet to seen any speeds "fail" this test, however you can not use the new settings until they are tested. It is best to check the box which enables the new settings to be applied at startup as the program seems to work best if the computer is rebooted between each overclock. Below is a screen shot of exactly what this utility looks like.

So now that we know how to overclock the GeForce2 MX, let's actually get down to the dirty business and fulfill our need for speed.


0 Comments
View All Comments